Being in college right now, we’re constantly hammered over the head about plagiarism, plagiarism, plagiarism. And with good reason! Plagiarism is the deceitful practice of trading off someone’s work as your own and thus reaping the benefits from it.
I searched Google about the legalities behind tracing, the first result showed me this article by Kiffanie Stahle and it boils down to about three points according to Kiff:
“To decide a course of action, we’d talk through three things:
Is the source imagery protectable under the Copyright Act?
Did you copy the source imagery?
Did your copying rise to the level of an infringement?”
The article helps give further detail in breaking down these points to help you better understand, so if anyone else is in a similar position to you OR does trace and would like to know more about that, check out the rest of the article. It’s not too dense if you were expecting it to be some thick, legal jargon.
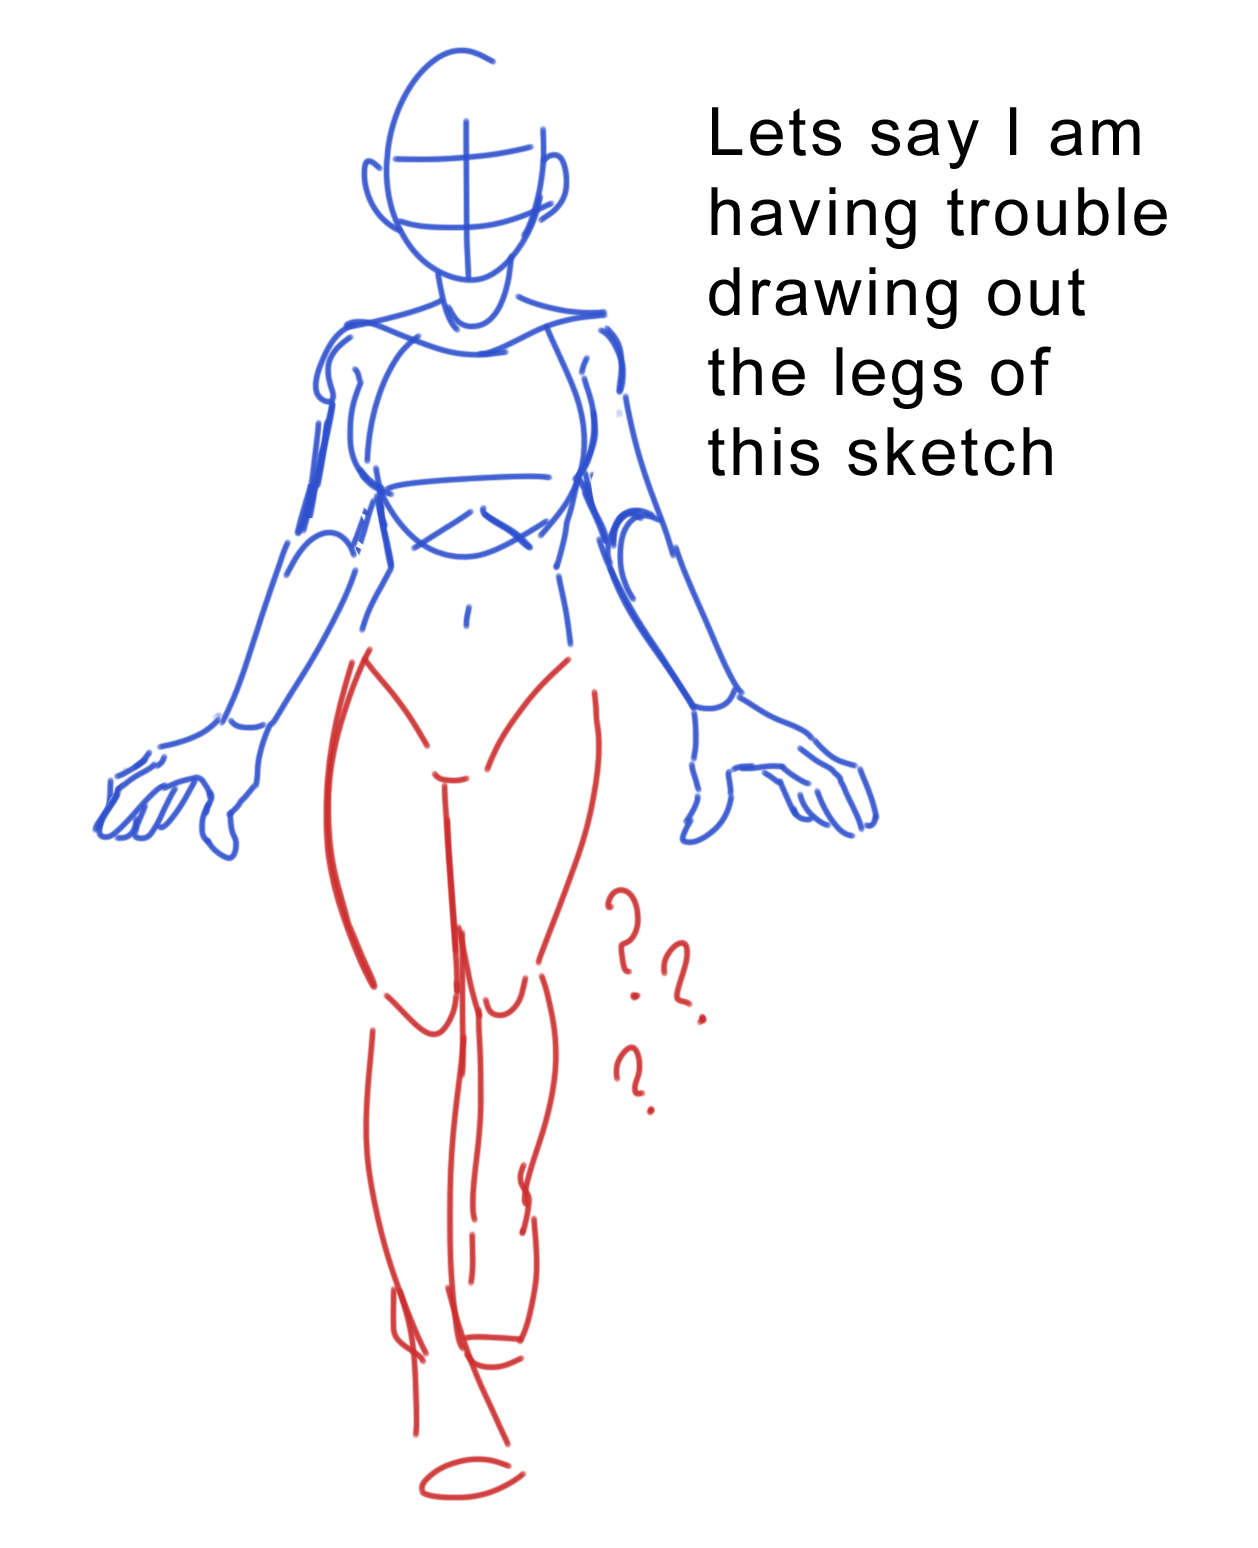
Coming back now to your specific situation though, here’s my personal hot take: it’s not plagiarizing. You said you already drew out the piece, and now you’re just having some trouble with the anatomy. So long as you’re not planning to redo the entire thing as one big tracing, I believe it would be safe to say you are allowed to correct your anatomy if you have a reference photo that can help.
Though before doing that!! I don’t know if this is the method you were planning to use, but I have a suggestion on how you can maybe go about this so that it A) is less direct tracing onto the picture and B) helps you to practice anatomy. I know it’s a bit tedious to do it this way, but I believe it will actually look more natural when implemented into your piece.
Have you seen this post before? Because it is an incredible practice that can help many folks who are just learning anatomy!
It is a very valid means of practicing and improving your anatomy. By trying to work backwards and break down the anatomy into more defined shapes that you can build from (I suggest using way more construction than I had so you can develop an even better understanding of the form) then you are gaining better knowledge of how to draw better!
In addition to this ask, there was another anonymous message received that I felt was similar to this one/was relevant to this ask too…
I think the answer to this lies within the three questions posed: “Is the source imagery protectable under the Copyright Act? Did you copy the source imagery? Did your copying rise to the level of an infringement?”
While I suggest to you to maybe perform the same method I demonstrated above (as yes, it can apply to gesture posing too!) I believe that you may want to just be careful of where the source comes from (to see what the copyright is on the images you are using),how much inspiration or tracing you plan to take away from the reference, and if you plan on merchandising the final product.
When submissions open for the weekend (15 + 16 September, 2018), we’ll enable submissions on our blog. This opens up a different avenue for people to send things to us, different to asks or fanmail
App users will be able to submit by clicking the lil’ message bubble on the top right of our blog and selecting the submit option (which, I believe, is generally located underneath the “send an ask” option)
PC etc users will be able to submit by clicking the “submit” link in the string of links below our description (it’s not there yet because submissions aren’t open, but it’ll look like this when they do)
Oh, mama! ( this is gonna be long ) I have been waiting to talk about this since forever. Developing and drawing for a comic is so much different than drawing for illustrations, simply prompting yourself to draw in a simpler style is only going to take you so far. However, there are ways to prepare yourself and your drawing skills for an undertaking such as comics and other formats of sequential storytelling.
DISCLAIMER: I couldn’t find any comics that allowed me to grab enough behind the scenes content to discuss this topic properly, so I’ve gone ahead and committed a cardinal sin, and used my own current project for some of the examples.
A quick, crude crash course in styling and designing your comic book
Mainly on how to keep consistent widths for windows.
Ignore how the final result has wonky lines, i spit this out real quick so when i “inked” the final lines i just kinda did whatever, i’m pretty sure the method is technically sound.
This was to help my friend @lightofdoodles and she asked me to put it on tumblr so um sorry if this makes no sense. This is mostly for her (Hi) This assumes that you know some basics on perspective + know how to find the midpoint on something in perspective + you read the other tutorial I linked.
WebGL Wateris a great water simulator, with a sphere that can interact with the water’s surface. It can be paused which means you can then use it as a reference for lighting, reflections, refractions, etc.
As artists, we can often feel like we’ve plateaued on our progress because of lack of time, or resources. Not every artist has the time to go to art classes, and not every artist has the money to attend art-school and receive a proper critique.
That’s why I’ve created this blog! Introducing the…
The Redline Station is a blog that is dedicated to helping artists. If an artist is struggling with anatomy, or would like a critique on their art, they can submit the art using the SUBMIT YOUR ART button. Then, one of our moderator artists will pick up their piece and do a redline of it to help them better see the places that need fixing.
What’s a redline?
Good question!
A redline is when an artist will draw directly over a piece of art in order to show what the mistakes in anatomy are. By seeing the comparison of the art itself (at a lower opacity) and of the more accurate anatomical example, the artist can more quickly improve their drawing.
Our artists will take your submitted drawing and give you a redline. They will then post it to the blog alongside the original to help you compare the two and easily see what needs to be done. It’ll look somewhat like this!
Q: Can I submit anything?
A: Yes! Any type of art, human or animal is okay! The only thing that’s not okay is gore and pornography. The posts will need to be PG-13. (Kissing and suggestive scenes are okay, however.)
Q: Will you redline if the drawing is in my style?
A: Yes! Anime style, cartoony style drawings are also okay. The idea isn’t to fix the drawing to look more like ‘realism’, but to fix it to make it look more believable within the frame of style it’s already in.
Q: How many drawings can I submit for redlining?
A: For the time being, I’m the only one running the blog… In order to keep my sanity, I will accept only one submission per person and only keep submissions open for a limited time until I get more help. Which brings us to our next point…
Backgrounds can be really tough! I think the first hurdle in drawing backgrounds is-well, just drawing them, but also trying to understand them in a way that you can make them look inhabitable. The first tip to just getting started with backgrounds and environments is probably to simplify and break it down just as we do when drawing characters!
Here are a few posts I’ve come across that have some helpful information as well as a couple hacks that might be useful too!
“A Master post of Thomas Romain’s art tutorials” A photoset post showing a collection of tutorials that all show tips/tricks on how to draw out a simple floor plan and then make it 3D, understanding different eye levels and how that affects the perspective in a picture, how to keep characters/people proportional in a 3D environment, and more! by Thomas Romain (twitter)
“Meg Presents… (more) Perspective! (again)” A photoset post of a tutorial on perspective, helpful for giving step by step instruction and demonstrating the use of perspective. Even if you feel you have a good grasp on perspective, you may want to give it another look over. As it is the prequel post to the next suggestion. by @thundercluck-blog
“Background art 1″ An article by an artist who discusses the thought process and steps put into creating background art. It is insightful and gives interesting depth on understanding how to make background art that is interesting and have variety. By Leo De Wijs (personal website)
“A crash-course guide on perspective” A photoset post of a tutorial on how to place characters into a scene. It’s very basic and assumes for you to have a basic understanding over perspective as it uses simple grids to properly keep a character proportional no matter where they stand in a room and even at different angles! by @katamism
“BACKGROUND PAINTING TUTORIAL” A YouTube video tutorial done by a professional background artist for Disney, she speed paints a background while given tips and advice while the video plays. She works in Photoshop, but watching the video could give you some insight and inspire you on how to work on backgrounds too! by @lulusketches / Laura Price (YouTube)
Before going to post this ask, another ask came in that I felt a need to include in with this entire post. As it is pretty similar, but:
I believe the tutorials listed above should help you out, while the examples lean more towards realism, they can still very well apply to cartoony styles. It’s a matter of having a basic understanding perspective. Though you’re perfectly allowed to give backgrounds a style of your own!
Check out art created by background artists for cartoon shows, like @matthewthiebes or @stevensugar. Their background art works use perspective constantly.